Wednesday, October 17, 2018

🔴 How to Log Out of Instagram 2019

How to Log Out of Instagram 2019

Instagram is a social networking service that enables you to share business-related photos or personal photos with your Instagram followers. Instagram is available for mobile devices (Android and iPhone) and of course on PC's via Internet browser like chrome, safari. Firefox Mozilla etc. For new Instagram users, logging out of the Instagram account is little difficult as there is not a visible "Log Out" button in on screen which means Instagram does not provide a direct option to log out of your Instagram account. The procedure for Logging out of Instagram is same an Android device or iOS, however, the PC version offers a more conventional and easy way to log out of the Instagram service.


How to log out of Instagram 2019?

Navigate to your Instagram profile and sign out of the Instagram app or the web version of Instagram.

The web version of Instagram

These are two steps to log out of Instagram on PC/ computer/ laptop in 2019
Step 1: Click or Tap on your Profile located on the upper right corner of the webpage
Step 2: Click or Tap on Gear Icon located beside “Edit Profile” and click Log out or Sign out to log out of your Instagram account.

See the Video for help
https://youtu.be/Dqo7hP_NNvY

How to log out of the Instagram account on iPhone or Android devices in 2019

Step 1: Firstly, launch your Instagram app and Go to your Profile option [bottom right corner of screen].
Step 2: Now, click on the three-lines button [top right corner of the Screen]
Step 3: A new screen will appear, click settings, the gear Icon [bottom right corner of the Screen].
Step 4: Scroll to the bottom of the page and click Sign out [username].

See this Video for help
https://youtu.be/XTh_y7eJgoI


That’s it, these are the procedure you have to follow to Log out of Instagram account from PC or desktop, Android or iOS (iPhone or iPad) in 2019 after the new update.
Share:

Tuesday, October 9, 2018

🔴 How to create a Hiren Boot cd 2019 USB Flash Drive

How to create a Hiren's Boot CD 2019 USB Flash Drive

      Hiren’s BootCD (HBCD) is a bootable CD that has a set of tools that can help users to solve their PC/computer issues if their operating system fails to boot. Especially, HBCD contains many useful programs like hardware diagnostic programs, partition tools, data recovery utilities, antivirus tools and several other tools to fix computer issues. I have written this article on HBCD because I frequently use Hiren’s BootCD to troubleshoot my computer problems, especially when a computer doesn't boot due to various reasons such as a virus attack or corrupted file system of Windows etc.

In this article instructions on how to create bootable Hiren’s BootCD on a USB flash drive (stick) is given below.


How to create a Hiren's Boot USB Flash Drive.


Step 1. Download Hiren’s BootCD iso

1. Download Hiren’s BootCD 15.2 iso to your computer from HBCD official download page http://www.hirensbootcd.org/download/)

click on “Hirens.BootCD.15.2.zip”  to start the download


HBCD


2. When the Download is completed, extract “Hirens.BootCD.15.2.zip”.


Step 2: Download RUFUS USB Boot Creator Utility*.
* Rufus is an excellent utility and widely used to create bootable USB flash drives, such as pen drive/USB keys/memory sticks, etc.

1. To download Rufus tool go to the official Rufus download page and download RUFUS USB Bootable Creator Utility on your computer or Click here Rufus 

Step 3. Create a bootable Hiren’s BootCD USB flash drive.

1. Remove all USB storage drives (pen drive, memory card etc) from your computer and plug an EMPTY USB stick (minimum 4GB) to the USB port.

Attention: all the files present of the USB drive will be deleted don’t forget to backup your data.

2. Now, double-click on “Rufus” application to launch it.


When Rufus utility is launched:

3. Select the empty USB stick or pen drive that you just plugged in on your computer.


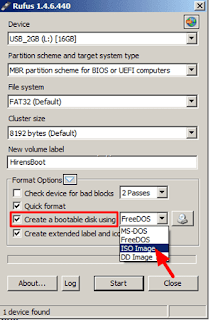
4. At “Create a bootable disk using” option, select “ISO Image”.


How to create a Hiren's Boot USB Flash Drive


5. Then click the disk icon beside “ISO Image” to select the Hiren’s ISO Image file “Hiren's.BootCD.15.2”.iso” from your computer hard disk.


How to create a Hiren's Boot USB Flash Drive


6. Go to “Hiren’s Boot 15.2” folder and then select the “Hiren’s BootCD 15.2.iso” image file and select “Open”.


7. Now click “Start”.
How to create a Hiren's Boot USB Flash Drive


8. You will see the Rufus notice “warning: all data on the device will be destroyed etc”Read the warning message and press “OK”.

Rufus utility starts to erase your USB stick and will start copying Hiren’s Boot ISO files to it.

9. When copying files are completed, close Rufus utility, unplug the USB stick. Yeppy you successfully make Hiren's bootable USB flash drive now you can use this bootable HBCD USB drive to boot.


How to boot from Hirens boot USB


  To boot from the Hiren’s Bootable USB stick, you need to set the USB as first boot device from BIOS settings. Here is how you can do it:

1.   Power On your computer and press "DEL" or "F1" or "F2" or "F10" to enter BIOS (CMOS) setup utility.
(If you are not able to enter BIOS see on screen what keys appears at start and press that key).

2.   When you enter the BIOS menu, go to "Boot Order" setting.
(Most commonly you would find it in"Advanced BIOS Features" menu).

3.   In “Boot Order” setting, set the USB-HDD as a first boot device.

4.   Save and exit from BIOS settings.


That's it! In this way, you can create a Hiren's Boot USB Flash Drive and use it to solve your computer problems. If you have any problem related to how to make Hiren's bootable USB flash drive don't forget to comment and ask for help!

Share:

How to create ISO file of Windows 10

How to create ISO file of Windows 10

The ISO also called as ISO image is a single file which is the perfect copy of the entire DVD, CD or Blu-ray disc. The entire content of the disc can be duplicated in a single ISO file as it is. Making ISO file from any disc is a very easy process with the right free tool and it is the best way to backup important DVD, Blu-ray discs or CDs on your hard disk. Microsoft Windows at present don't have built-in software to make ISO file so you will need to download a program to do create iso image of windows 10 in ISO format.


Fortunately, there are many tools available that can make or create iso file of Windows 10 in simple steps. Although many softwares are available most of them are paid versions. Among all the softwares available, one of the best software to make iso file from DVD/CD/Blu-ray in windows 10 is  ImgBurn and the obvious reason is, it's a freeware.

How to create ISO file of Windows 10

  1. Download and install ImgBurn (a free program that can create Windows 10 ISO image from all types of discs like DVD, CD, and Blu-ray)
  2. Run ImgBurn either from shortcut created on your desktop or automatically at last step after the installation is finished.
  3. Insert the Windows 10 disc you want to Backup in ISO file into the disk drive
  4. In ImgBurn, click on "Create image file from disc" located in the What would you like to do menu
How to make ISO file from DVD/ CD/ Blue-ray Disc In Windows 10

     5. After you, Click Create image file from disc, the copying will start and the Windows 10 iso image will be created and stored to your hard drive as ISO file.

Watch This Video


This is the simplest procedure to create Windows 10 iso image. You can mount this ISO image whenever you need.  If you have any suggestions or question please drop down your comments below on How to create ISO file of Windows 10
Share:

Monday, October 1, 2018

How to Change Gmail Background Image

How to Change Gmail Background Image

Many Gmail users don't know they can change Gmail background image/Picture/Image on their Gmail account using Gmail Themes option. Or maybe they do know but like the default Gmail theme. If you’ve found your way here, then I guess you are among the Gmail user who doesn’t know and would like to figure out change Gmail background image/Picture/Image
When you use Gmail, the only colors that come to mind is either blue, red or both. These colors are Gmail standard colors for years and have not changed and most probably it won’t change in the future. Now, if you’ve been using Gmail for a long time using your Chrome browser, probably for work etc. Chances are, that you might have got tired and bored of the default theme.
Now you can spice up your Gmail looks as Gmail now provides a lot of themes to choose from after you login to your Gmail account. The wallpapers/Images available are very beautiful. Gmail provides you to choose a random picture/image from the internet or use a picture/image from your PC. Also if have any picture on your Google+ account, you use them too as Gmail background image.
Give it a try by following these simple steps given below to Change the background image of your Gmail account.

How To Change Gmail Background Image

·         Head on to  Gmail Website using Google Chrome browser on your PC and Signed In to your Google account.
·         Click on the Gear Icon (settings) at the upper right corner of the screen.
Change Gmail background image

·         Click on the Themes Option from the drop down Menu. This will take you to the Gmail background themes (Pick your theme).
·         Click on My Photos to see categories like Featured, My Photos and recently selected
·         Click any one picture you like and Click select and save. You will see the background image has changed and now your Gmail doesn’t look boring like before
Following are the meanings of categories
·         Featured – Gmail Wallpapers.
My Photos – Google+ Photos.
Photos from my phone – Google Photos on your Android.
Upload Photos – Upload Photos from your PC.
Paste a URL – Provide a picture link to Use the picture.
Recently Selected – Recently Used.
·         The above are the options provided, and what they mean.


Conclusion

That’s how to Change Gmail background image to personalize the looks of Gmail to something you like.  Give a facelift to your Gmail account and make it look awesome with wallpaper of your choice.
Share: