Tuesday, January 21, 2020

🔴 Hirens Boot USB Stick from Hirens Boot CD 16.2

Hirens Boot USB

What is Hirens Boot USB


The Hirens Boot USB is a USB flash drive on which ISO contents of Hirens BootCD are copied. Usually, the USB drive created as a bootable device and allows the user to perform various rescue tasks.  


What is Hirens Boot CD 16.2

If just heard of this tool but don't know what it is let me tell you that Hirens Boot CD is, essentially. Basically, it is an all in one rescue disc which has a collection of all crucial softwares need to rescue your computer. Following are the ISO content of the amazing tool.


  1. BCD- MBR Tool
  2. Hard Disk tools for data recovery
  3. Hard disk tools for imaging 
  4. Hard disk tools for partition
  5. Hard disk tools for defrag
  6. Hard disk tools for disk explorer 
  7. Hard disk tools for security
  8. Windows Recovery tool
  9. Removable drive tools
  10. Antivirus
  11. Security-key finders
  12. Security tools for password recovery
  13. System tools 
  14. Network software 
  15. Other tools like 7-zip, Free office, etc. 

Hirens Boot CD 16.2 ISO free download 2020 

You can download this bootable software kit in ISO format. The iso disk image is available to download on https://www.hirensbootcd.org.
Click here to download the ISO image (HBCD_PE_x64.iso).

Hirens Boot to USB Flash Drive

To add contents of the ISO disk image onto the USB device, there are two easy methods to make Hirens Boot USB flash drive (USB stick).
  1. Hirens BootCD PE - ISO2USB tool
  2. Rufus 3.8 tool

How to make Hirens Bootable USB using Hirens BootCD PE - ISO2USB tool

Following are the steps 
  1. Insert and format USB flash drive (USB stick)
  2. Launch  Hirens BootCD PE - ISO2USB tool
    Hiren's BootCD PE - ISO2USB V1.0
  3. In option "USB device" select the flash drive (USB stick)
  4. In the option "ISO file" click the search icon  
  5. Locate the ISO file on your hard disk and click 'open" 
  6. Right tick "Format selected USB device" and "Copy ISO contents to USB device"
  7. Click on "Process" option to copy ISO contents on to the USB flash drive (USB stick)
After finishing the process you will get Hirens bootable USB.

How to make Hiren's Boot USB using Rufus Tool 

Rufus is one more excellent utility to make Hiren's bootable USB fast.
Following are the steps to make bootable USB  
  1. Launch Rufus tool
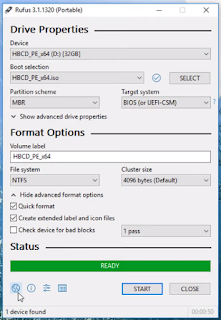
    hirens boot usb rufus
  2. Under Device option, Select proper USB flash drive 
  3. Under "Boot" selection option, Select Disk or ISO Image
  4. Click on "Select" 
  5. Select ISO file and click "Open"
  6. Under partition Scheme Select "MBR" and Under "Target System", Select BIOS (or UEFI-CMS)
  7. Under "Format Options" In "File System" option select "NTFS"
  8. Under the "Status" menu Click on "Start" 
  9. It will show you a warning message just click OK to proceed 
This is how you can easily copy Hiren's BootCD on USB using Rufus tool.

How to use Hiren's Boot USB

To use bootable Hirens Boot USB flash drive you may need to configure your BIOS setting.
  • Every motherboard will have a specific key to assess BIOS.
  • Usually, when the computer starts you may see Press -- key to enter the BIOS.
  • If you don't see then just search How to enter BIOS with your computer laptop or motherboard brand name and model.
  • Once you access BIOS setting 
  • Navigate to "Boot" option
    HIRENS BOOT USB BIOS settings
    • Under Boot Device Priority select 1st Boot Device " USB"
    • Save and Exit BIOS
    • This time the computer will boot from the Hirens Boot USB flash drive 

I hope I covered everything related to Hirens Boot USB in this article that is needed. If you have any difficulties in creating the bootable device please comment below and let me know. I will be happy to help you. 

Share:

Friday, January 17, 2020

🔴 How to Add Signature In Outlook

How to Add Signature In Outlook

If you are wondering How to Add Signature In Outlook then this article is for youIn this article, know in Microsoft Outlook how can you create a personal signature for your email messages. Your outlook email signature template can include handwritten Signature, company logo, images, electronic business card, etc.
If you want to know how to do it here are the steps shown in the video

  1.  Open Outlook in your Web Browser 
  2. Click on the "Settings" icon (Gear Icon) present on the upper right corner of the screen 
  3. Search "Email Signature" option in the search box
  4. Click on the "Email Signature" option 
  5. Click on the "Image icon" and insert Handwritten signature, logo or image, etc
  6. Resize the inserted Handwritten signature, logo or image, etc
  7. Add information like Name, Designation, Department, Institute/ Company name, country, Phone Number and email address
  8. Select both options 
    • Automatically include my signature on new messages that I compose 
    •  Automatically include my signature on messages I forward or reply to
  9. Click "Save" to save the signature and other elements and Close the Window (X)
  10. Click on New Message at the upper left corner of the screen 
  11. You will now see Email signature in Outlook Email 
I hope now you will be able to add signature in outlook email that you compose or reply to
Share:

Thursday, January 16, 2020

How to Change Video Quality on Netflix

How to change video quality on Netflix

In this article, I will show you how to change video quality on Netflix easily on your Netflix mobile app on iPhone, iPad or Android. 
First of all, you need to make sure if your plan supports HD.
  • If you have opted for 1 screen SD plan, then Netflix does not allow the option to change the video quality
  • If you have opted for 2 screens and 4 screens at a time Netflix plans, then only Netflix provides an option to change video quality to HD or Ultra HD
Their two reasons for the poor video quality on Netflix which are 
  1. Poor internet speed
  2. Playback settings not defined 
By default, Netflix sets the playback quality to auto to get the best-uninterrupted video viewing experience based on the internet speed. Netflix has three other option beside auto playback quality 
  1. Low: This Netflix quality setting provides basic video quality and consumes only 0.3 GB data per hour of usage
  2. Medium: This Netflix quality setting provides standard video quality (SD) and consumes 0.7 GB data per hour of usage
  3. High: This Netflix quality setting provides the best video quality (HD) and consumes 3 GB data per hour of usage and 7 GB data per hour for Ultra HD

So, depending on what video quality you want you to have to pick the right option in Netflix playback Settings. The higher the option you choose, the better video quality you will get.

How to change video quality on Netflix app

  1. Launch your Netflix app on your mobile
  2. Enter Username, Password and sign in 
  3. Choose a Profile if you have multiple profiles, the settings will be applicable to the only selected profile
  4. Click on the More Option at the bottom right corner of your screen 
  5. Click on Account. A webpage will open that will show all Netflix account settings 
  6. Scroll down at the bottom and click "Playback Settings"
  7. By default data usage per screen is set to "Auto" to change video quality to high, Select "High" and Click "Save"
  8. You will see "Playback settings saved"
Watch this Video

How to change video quality on Netflix PC | Computer

  1. Open Netflix website in the web browser
  2. Enter Username, Password and sign in 
  3. Choose a Profile if you have multiple profiles, the settings will be applicable to the only selected profile
  4. Click on the Profile Photo located at the upper right corner of the screen  
  5. Click on Account. A webpage showing all account information and settings will open
  6. Scroll down at the bottom and click "Playback Settings" under "My Profile Option"
  7. By default data usage per screen is set to "Auto" to change video quality to high, Select "High" and Click "Save"
  8. You will see "Playback settings saved"
That's it, in this way you can change video quality on Netflix on mobile, computer and easily fix poor video quality on Netflix.


Share:

How to Cancel Amazon Prime Trial 2020

How to Cancel Amazon Prime Trial 2020

If you opted for Amazon prime trial and now it is about to end and you want to cancel amazon prime trial 2020 from your iPhone or android mobile app then follow these steps to get out now.


If you recently took advantage of the amazon prime trial and the free trial is about to finish, Amazon will automatically charge you via credit card. To prevent any charges, here how you can cancel amazon prime trial.

Get 30-day Amazon Prime Free Trial
http://www.amazon.com/tryprimefree?tag=highdiscoun08-20 )


Watch this video, if you are lazy to read and follow the steps


Steps for How to Cancel Amazon Prime 2020

  1. Open you amazon prime video app on your iPhone, iPad or android
  2. Sign in to your amazon prime account
  3. Click on the Gear icon located at the right bottom of the screen
  4. Click on Manage account
  5. Under Prime Video Terms and condition Click on End Membership
  6. Click on the second option End
Get 30-day Amazon Prime Free Trial
http://www.amazon.com/tryprimefree?tag=highdiscoun08-20 )


This exact is a method for How to cancel Amazon Prime Trial subscription or membership on amazon prime video mobile app in the UK, India, USA, etc.

Share: